Training a Standard Wisteria

Wisterias are fabulous climbers in their own regard, they also lend themselves to training as a large standard.


Buy Wisteria

 I like Wisteria and I like some plants that are trained as standards, this is a good way to grow what is normally a climber without having a wall to support it. It is also a good longer term project as they are significantly larger and longer lived than most plants that are commonly trained as standards.

The Victorians sometimes grew standard Wisteria in parks, they can become self-supporting when mature and can have substantial pieces of ironwork amongst the twisted trunks from when they were younger and needed them.

A serendipitous trip to a garden centre meant that I saw a forlorn Wisteria in the "cheap and poorly plants" corner. I wasn't really looking for one, but decided it was time to begin.

Standard Wisteria
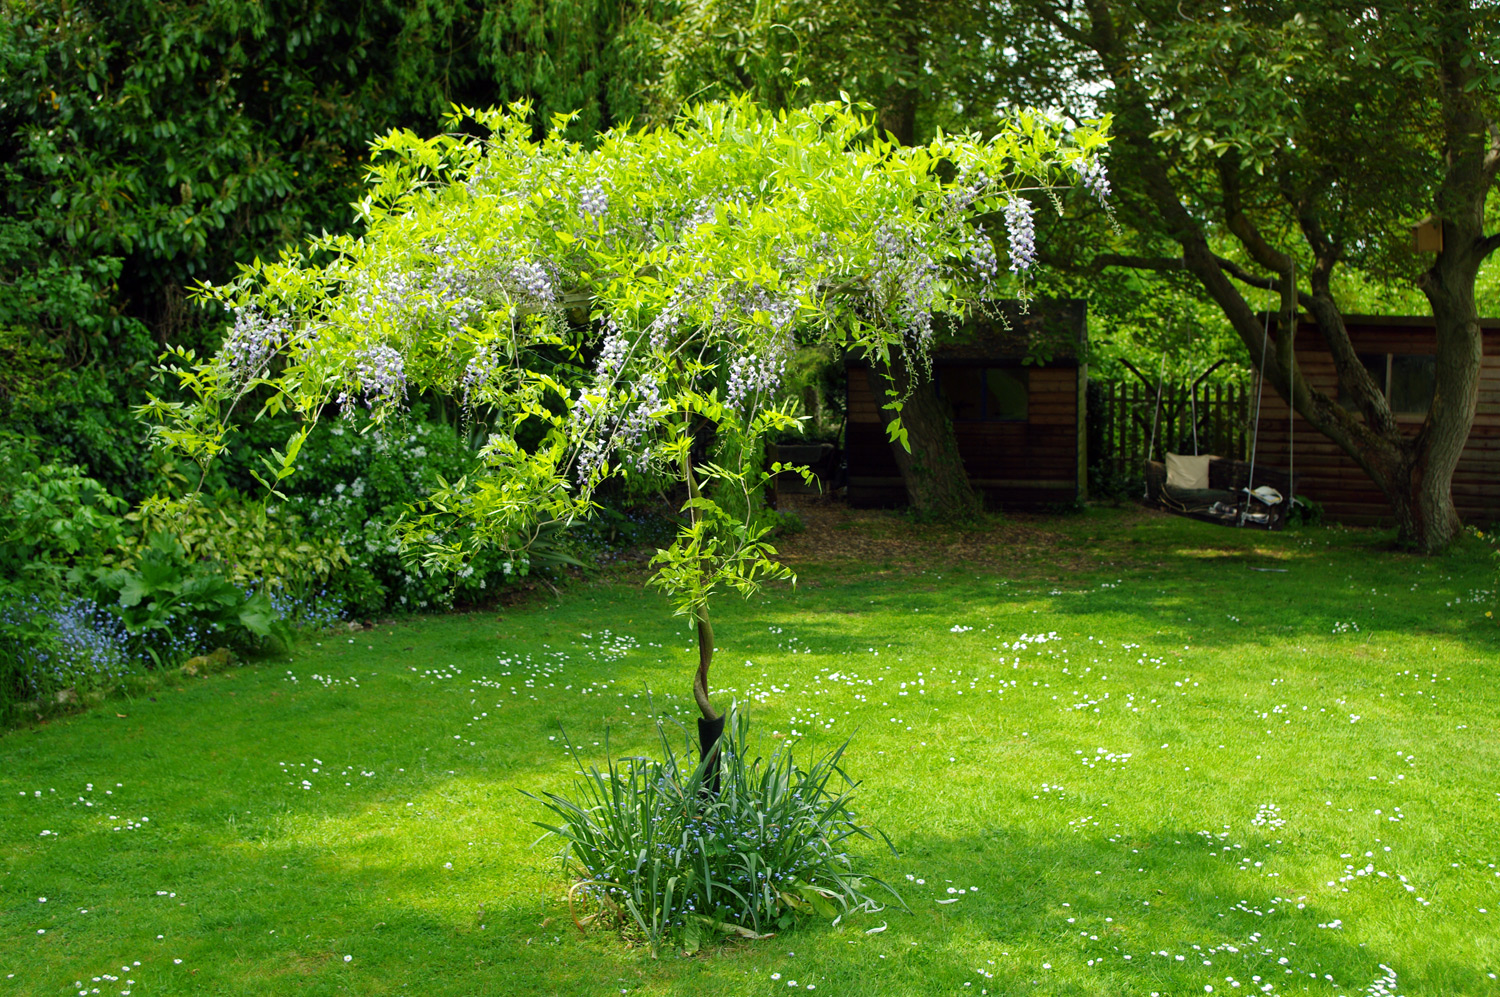
My standard Wisteria after about 4 years of training and growth.
Standard-Wisteria
Another couple of years on, about 6 years now, surroundings have changed and annual pruning has improved the shape and flowering.

To achieve this, I used:

  • Young Wisteria plant, a small plant with a single stem is best as you are going to train it yourself quite ruthlessly.
  • Multi purpose compost
  • 10L or 15L pot, (lesson learned - better to start in the ground in the final position)
  • A very strong support for the plant when in the large pot, I didn't use bamboo as I knew this would rot over a couple of years in the soil. As it was, my broom handle support also rotted. There needs to be a clear height from compost/soil level by the ultimate height of the standard plants stem, about 6 feet or more, (lesson learned - use the final substantial metal support from the start)
  • Substantial metal support for the tall and heavy plant, used after a couple of years when planting in the final position in the soil.

Step one with standards is a bit nerve racking as it entails cutting off all shoots bar one which is to be the leader and trained up the support - so here goes....


Blue Wisteria chinensisBlue Wisteria chinensis
£ 19.99

Wisteria Wisteria 'Tiverton'
£ 44.99

Wisteria - formosaWisteria - formosa
£ 37.99

Wisteria - formosa CarolineWisteria - formosa Caroline
£ 37.99

Wisteria - valderi BurfordWisteria - valderi Burford
£ 37.99

Wisteria - valderi Lavender LaceWisteria - valderi Lavender Lace
£ 37.99


As I wanted to go to 6 feet (1.8m) before I allowed the plant to start to spread horizontally I needed to put in a strong support which itself needed to be firmly held in the pot.

I screwed an off cut of hardwood (decking board as it happened) onto the end of a broom handle and planted them into a 10L pot. The little Wisteria was a bit lost to start with but soon grew into its home.

There is now about a 2 year gap while it grew strongly up and outwards - this co-incided with a lack of photographs I'm afraid, so you have to imagine the interim stages!

You have to be totally ruthless in removing side-shoots only allowing one strong stem to grow upwards. Leaves only that form directly from the stem can be left for now to provide the plant with food. Once the main shoot has reached the required height, then train it onto a large horizontal X with wires between the arms, you will need to work out how to attach this to the upright support. When enough leaves have formed at the top, the stem should be kept clear of all leaves and shoots which will continue to be produced every now and then, though in decreasing numbers.


The initial broom handle wasn't long enough especially as part of it was in a pot, so I had to add another bit onto it with some builders-band and wood screws to take it to the required 6 feet. I also attached a wooden X to the top with wires in between to encourage the shoots to grow around.

Once you let the plant grow outwards rather than upwards, this will be its final height. You will not be able to grow it higher than this as it sets the clear stem.

The whole thing was quite elaborate and large at this time and so the ends of two arms of the X were attached to the back of my house by screws to stop the whole thing blowing over. It had also progressed to a 15L pot by now too. The picture shows the set-up just as I was planting it into the ground.


Eventually rocking back and forth from the wind caused the spliced and screwed connection to fail, as the end of the wooden broom handle in the compost was starting to rot it seemed like the plant was telling me it was time to put it in the garden.

With help I transported it down the garden to where it was to be planted (above picture). Luckily the main stem was strong enough not to have suffered damage, but we had to be careful as the whole plant was very top-heavy by now and could easily be broken.


Given the state of the wooden supports after just a couple of years, I decided it was time to use some metal work to support the plant from now on.

I found some metal rods about 4 feet long that screwed together and so fortunately had a thread in the top too to take a bolt which held the supportive metal X. This would take the place of the wooden support. (lesson learned - use a metal support from the outset.)

I just happened to have these items lying around, if you don't have anything suitable, then I suggest a sturdy metal tube at least 1" (2.5cm) in diameter, 1.5" would be better. Angle iron would do the job admirably though wouldn't look so good and may be more difficult to train the stem around initially. Don't underestimate how strong the support needs to be, it turned out that what I have here wasn't even enough and the screw connection between the rods failed by snapping after another couple of years, I repaired it by sliding a stout close-fitting tube over the bottom one as a re-inforcing sleeve, and hammering it into the ground, then inserting the top one again, it was all very difficult and best avoided by using a stronger support to start with. (lesson learned - my first idea of what was hefty wasn't good enough, go up another step)


The final metal support needs to be very strong, it will hold the foliage in place 6 feet above the ground, the strain from strong winds when the plant is in full growth is very considerable, this is what the support needs to withstand.

I cut a circle out of the turf first as it was due to start off life in the lawn. I dug my planting hole, deeper than the 15L pot that the Wisteria was in and removed at least 30L of soil.

One of the screw-together metal rods was bashed about 2 feet into the ground with a lump hammer using a piece of heavy scrap wood to protect the end. Getting the depth right was crucial here as was measuring carefully the height of the plant above ground level. It was like I was going to keep the roof and chimney in place, but temporarily remove the supporting walls, if the new ones were too tall or too short, things would be a bit of a disaster!


Keeping the support vertical was difficult too, a job that took quite a long time and much careful measuring with tape and spirit level.

The hole was now ready to take the plant. First of all I half filled it with well rotted garden compost and mixed it in before making a hole again a little larger than the pot the Wisteria was in.

Again (sorry) there are no pictures of the stages whereby the Wisteria is detached from its old support, planted and attached to the new support. There were two of us doing this job and we had at least one arm too few between us (although we did have the normal compliment each) so there was no opportunity to take pictures while it was in progress.


The sequence of events was to slide out the old support pole and then remove the plant pot. One person then carried the pot and another the top growth placing it carefully onto the new metal X at the top of the metal support.

Very carefully the root ball was wound around the new metal support so that the stem spiralled up it in the same way that it had around the previous wooden support. This was a very tricky job as the root ball was very heavy and the stem quite easily snapped by the weights and forces needed to move it all.

Eventually though we managed it, the root ball was planted in the soil-compost mix without pulling on the stem or pushing it up too far.

A wooden supporting X (about twice as long as the new metal one) was attached atop the metal one and I breathed a sigh of relief.

At this point it will be nigh on impossible to replace the metal supports, so they need to be strong enough and placed firmly enough to never need replacing.


Wisteria are spectacular when they flower in spring, they need a lot of space if grown up against a wall, but are readily trainable and many live for decades. This one is in Corpus Christi College, Cambridge.


Mature Wisteria
Mature Wisteria will produce huge quantities of flowers against bronze coloured new foliage in the spring.
Mature wisteria growing up a country house
They will look particularly good against the back-drop of your country mansion. Hinchingbrooke House in Huntingdon here.


Buy Wisteria